
The Back Squat is a compound movement that works the entire body. It is great for developing strength and size. It can be loaded heavier than most other squat variations.
Skip Ahead
Setup
Execution
Advantages
Disadvantages
Cues
The Squat Progression
Squat Variations
Troubleshooting
Equipment
FAQ
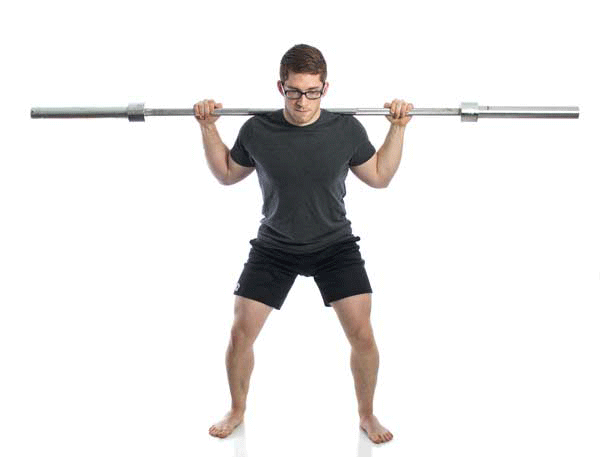
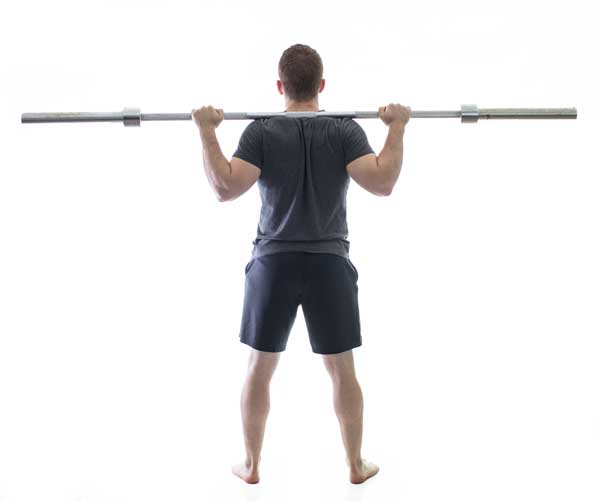
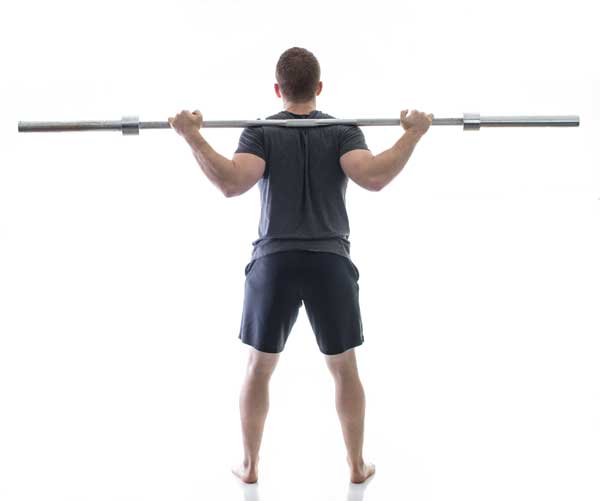
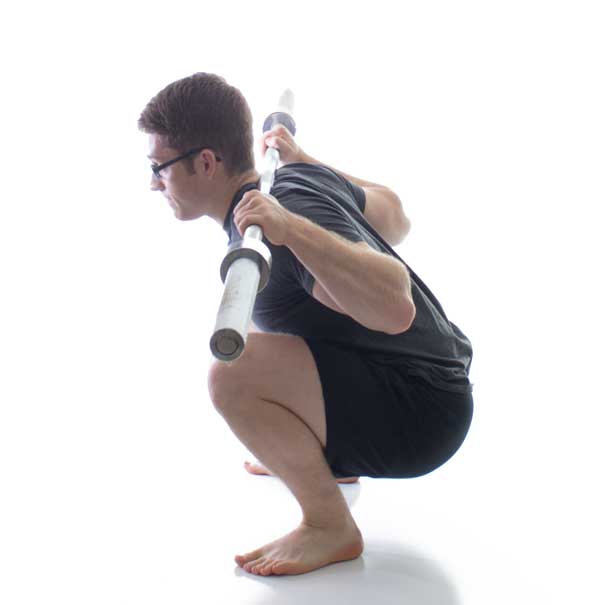
Setup
- Set the bar in a rack or cage ideally facing away from a mirror and into the room. The bar should be set at a height that is easy to get out of the rack while your feet are flat.
- Grab the bar with your hands evenly spaced apart. Find a grip width that is comfortable for your shoulders.
- Step underneath the bar and place it high on your shoulders.
- Pack the shoulders back and down.
- Stand up to unrack the weight, and take a step away from the rack.
- Set your feet so that your heels are shoulder width apart and toes pointed out slightly.
- Focus on a spot on the ground about 10 feet in front of you. If there’s a wall there, pick an appropriate spot on the wall. The objective is to keep your neck in a neutral position throughout the lift.

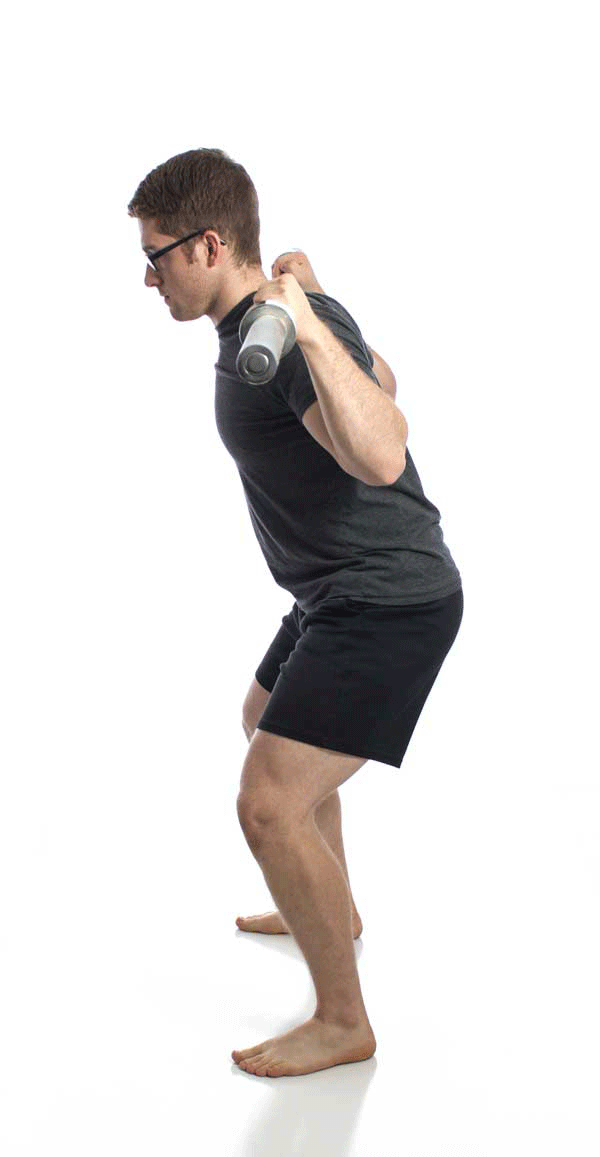
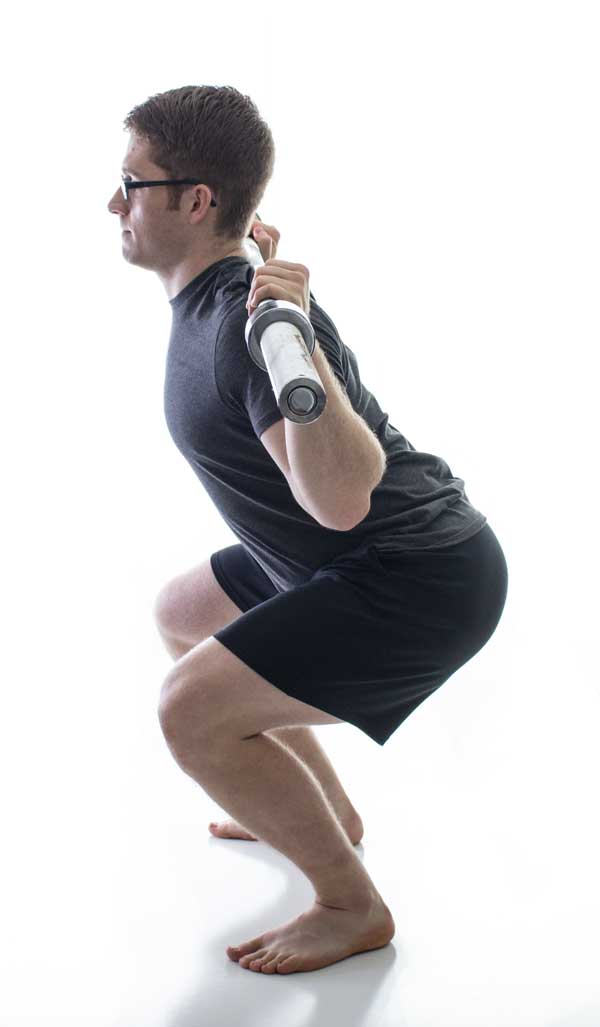
Execution
- Brace your abs and breathe in.
- Holding this brace, initiate the squat by breaking the hips back and down.
- Squat down as far as you can with a neutral spine position..
- Stand up to return to the starting position.
- Exhale.
The back squat offers a great balance between stability demand and ability to load with heavy weight. If you’re developing spinal stability, this would be the next progression after mastering the front squat. The back squat could be the last step in your progression as it allows heavy loads.
Advantages
- Use and placement of barbell allows for heavy loads.
- Multi-joint exercise that transfers well to daily activity.
- Easy to modify with load, bar placement, and squat depth.
Disadvantages
- Overuse and overloading of exercise can wear down knees, hips, and spine.
- Requires spinal and pelvic stability before it can be loaded heavy.
- Complexity of movement can make technique difficult to learn.
Cues
- Knees out
- Spread the floor
- Chest up
- Pull the bar into you
- Set up routine
- Feet stay flat like roots in the ground
- Flat like a board from head to tail
- Sit back throughout
- Sit back at the bottom
- Stay tight at the bottom
- Bracing routine
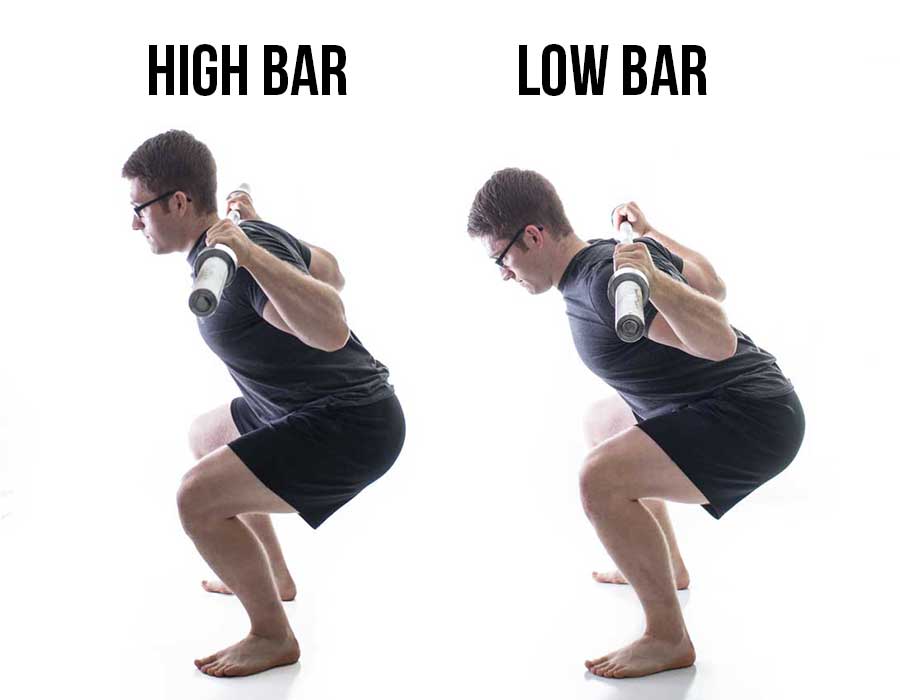
High Bar Squat
We recommend the high bar squat whenever possible. In a high bar squat, the bar is placed high up on the shoulders and the torso remains more vertical.
Advantages
- More upright torso angle
- Easier to squat deep
- Less extreme shoulder position and therefore less stress on the shoulders
- Less extreme range of motion at the hips
Disadvantages
- Requires slightly more ankle mobility
Low Bar Squat
In a low bar squat, the bar is placed low on the shoulders with a more horizontal torso position.
Advantages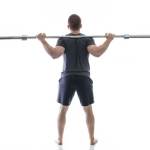
- Requires slightly less ankle mobility due to the more vertical shin angle
- Loads the posterior chain more
- Allows a powerlifter to sit back and get more rebound out of a squat suit
Disadvantages
- Puts more load on the lower back due to the more horizontal torso position
- May limit squat depth
- More extreme shoulder position
- More extreme range of motion at the hips
- Lifters are more likely to lose neutral spinal position during a low bar squat
The Squat Progression
The squat progression is designed to teach lifters the basic movement pattern of the squat. These movements are listed roughly in order from easiest to hardest.
Easier Exercises
- Rock Back
- TRX Squat
- Body Weight Squat
In the easiest exercises, the focus is on simply learning the movement while maintaining neutral spine. The body is stabilized externally by the ground, TRX, or placement of the weights, making it easier to maintain proper form. This external stability also allows the body to move through a greater range of motion that may be too difficult otherwise. Once a lifter has mastered these exercises, they may still provide a useful warmup to reinforce that ideal form.
Intermediate Exercises
- Goblet Squat
- Plate Squat
- Front Squat
- Safety Bar Squat
Intermediate exercises, such as the front squat or safety bar squat, primarily use anterior (front) loading to change the center of gravity. This forces a lifter back, activating the hamstrings and glutes. This is useful for lifters who have a difficult time squatting with a full range of motion or those who lose their spinal alignment at the bottom of the squat.
Advanced Exercises
- Back Squat
- Overhead Squat
- Jump Squat
In the more advanced exercises, external stability has been taken away. These exercises may also incorporate dynamic movements, such as the squat jump, or they can be used with greater loads, such as the back squat.
| Easy | Stability | Potential Load | Dynamic |
| Rockback | High | Low | – |
| TRX Squat | High | Low | – |
| Body Weight Squat | Moderate | Low | – |
| Goblet Squat | Moderate | Moderate – Anterior | – |
| Plate Squat | Moderate | Moderate – Anterior | – |
| Front Squat | Moderate | High – Anterior | – |
| Safety Bar Squat | Moderate | High – Anterior | – |
| Back Squat | Moderate | High – Posterior | – |
| Overhead Squat | Low | Moderate | – |
| Jump Squat | Low | Moderate | Yes |
| Difficult | Stability | Potential Load | Dynamic |
Squat variations
Box Squat
A box squat can be used for three purposes:
- To teach the lifter to feel more comfortable sitting back into the squat.
- To limit range of motion for those that have issues towards the bottom of their squat.
- To increase squat depth for lifters who fail to access their full range of motion by giving them a target to aim for.
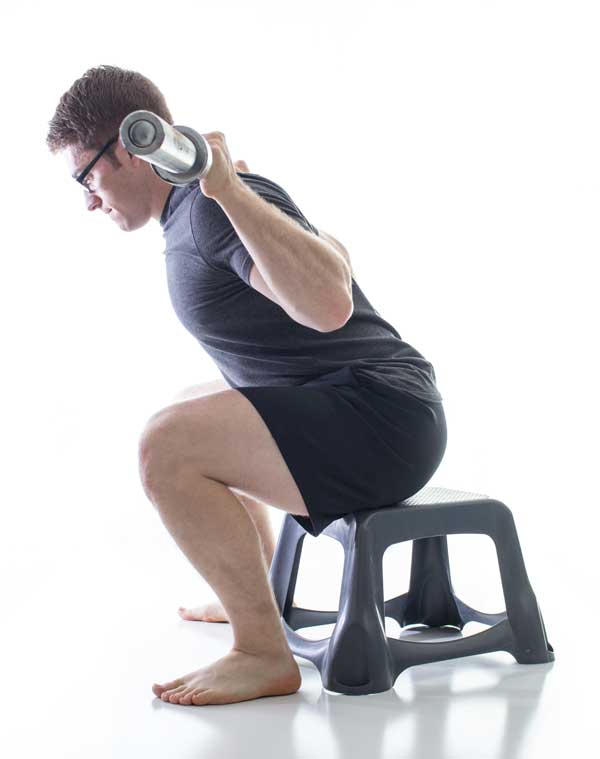 We highly recommend the box squat as a tool to clean up a variety of issues when squatting. It is especially helpful for those that fall forward onto their toes or are hesitant to sit back. By sitting back, a lifter shifts more of the load to their posterior chain often improving mobility.
The most effective use of a box is to give a sense of the body’s position at the bottom of the squat. The box acts as a barometer for squat depth and as a safety measure in case the lifter falls backwards.
By focusing on gently tapping the box, the box squat can be used to slow down the movement, allowing a lifter to focus on form. Alternatively sitting back on the box can be used as a cue to accelerate out of the bottom of the squat.
Setup
- Set the box at your intended depth. If the box isn’t adjustable an Airex pad can be used to add height to the box.
- Place the box so that a corner is pointed forward between your legs.
Execution
- Execute the squat as described above, using the box as a target for depth.
- Don’t let go of your core brace at the bottom of the squat.
Pause Squats
Pause squats are a more advanced alternative to the box squat. By pausing at the bottom of the squat the stretch reflex is eliminated. This also teaches a lifter to:
- Control descent
- Be more comfortable and control the body at the bottom of the squat
- Ensure adequate depth
Setup
- Set up as you normally would for a back squat.
Execution
- Execute the squat as described above, carefully decelerating at the bottom.
- Don’t let go of your core brace at the bottom of the squat.
- Pause at the bottom. This can be a brief pause or for a timed count.
Squat with Chains
Chains gradually increase the load as the lifter approaches the top of the lift. Chains resting on the ground are not felt by the lifter. As they are pulled off the floor, total load increases.
Chains are frequently used to:
- Increase the load where the lifter is strongest.
- Decrease the load at the bottom of the squat.
- Develop lockout strength at the top of the lift.
- Teach the lifter to accelerate out of the bottom.
- Teach the lifter to stay tight throughout the movement.
Fatter chains are typically hung from a smaller adjustable chain. By varying the length of the top chain, the point at which the load increases can be adjusted.
Chains that don’t reach the ground can be used to reduce stability requiring a lifter to resist the swinging of the chains and to learn a smoother squat motion.
Squat Against Bands
Like chains, bands can be used to increase or decrease load at different portions of the lift. This accommodating resistance is great for working through sticking points.
In general, bands provide a much more rapid change in load than chains, depending on the length and strength of the bands.
When squatting against bands, the bands pull down on the bar, increasing the load at the top of the motion. Thicker bands provide more resistance.
Setup
- Place the bar in the cage
- Wrap the band around the band pegs at the bottom of the cage. If there are no band pegs available, connect the band to the cage or a heavy dumbbell via girth hitch.
- Note that the bands should be centered inline with where the bar will be when lifting (over the feet), not necessarily where the bar rests in the rack. This ensures the bands pull straight down while lifting.
- Run the top of the bands around the bar.
- Multiple bands can be used to adjust the load and rate of change.
Execution
- Squat as normal.
Reverse Band Squat
When doing a reverse band squat, the bands pull up on the bar, reducing the load at the bottom of the squat. Thicker bands make the weight lighter.
Setup
- Place the bar in the cage
- Wrap the band around the band pins at the top of the cage, or, if none are available, connect the band to the cage via girth hitch.
- Note that the bands should be centered inline with where the bar will be when lifting (over the feet), not necessarily where the bar rests in the rack. This ensures the bands pull straight up while lifting.
- Then run the bottom of the bands around the bar.
- Multiple bands can be used to adjust the load and rate of change.
Execution
- Squat as normal.
Bands Around the Knees
Squatting with bands around the knees forces a lifter to push the knees out, preventing knee valgus. This is an excellent way to learn proper knee position.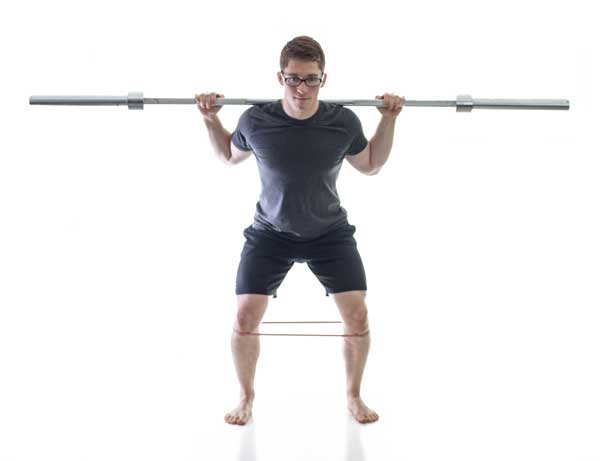
Setup
- Setup as normal
- Step inside a 12” mini band (light resistance) and pull it up until it rests either just above or just below the knee.
- This should provide a light resistance.
Execution
- Press the knees out so that they are in a neutral alignment. They should hover over the feet at the bottom of the squat.
- Keep weight evenly distributed over the entire foot.
- Squat as normal.
- Try alternating between bands and no-bands to reinforce that neutral position without the bands.
Reduce load as necessary. Bands around the knees may make the lift significantly more difficult for some lifters and significantly easier for others.
Care should be also taken to avoid pushing the knees into varus. If you notice pain or the weight forced to the outside of the foot, the knees may be too far out.
The goal is to quickly progress past this variation of the squat. Avoid using the band as a crutch by alternating between bands and no-bands to reinforce neutral knee alignment without the bands.
Squat with Stick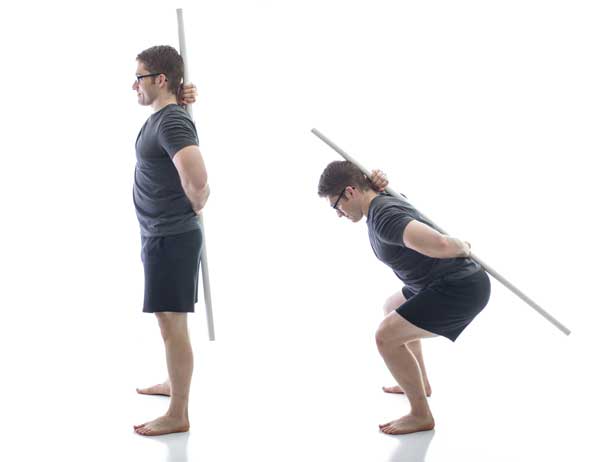
Squatting with a stick on the back is very helpful for lifters who have difficulty finding a neutral spinal position. Feeling the stick helps the lifter become aware of their back position. The stick squat is particularly useful for learning the difference between hip movement and lower back movement.
SETUP
- Setup as normal
- Place a stick or PVC pipe along the spine. One hand should be behind the neck. The other hand should be behind the low back.
- Find three points of contact with the stick: the butt, the mid back, and the back of the head.
EXECUTION
- Squat as normal.
- Maintain these three points of contact with the stick throughout the movement.
Troubleshooting
Motor control problems are responsible for most squat issues. Motor control is the ability to coordinate the right muscles at the right intensity at the right time. Motor control is heavily influenced by body position, so by changing our squat position we instantly increase mobility. Once we fix the body position and restore motor control, we can reinforce a better squat pattern and then increase load.
These problems usually originate at the core and then flow out to the periphery. So before addressing knee position or shoulder position, it’s vital to fix any hip and core dysfunction. These fixes will typically drive changes throughout the squat.
In the following sections we have identified common problems and potential fixes. Not every fix is right for you. Look carefully at the images showing each problem. Note where the knees and hips are, where is the weight relative to the feet, the curve of the spine, etc. The problems may look subtle, but we want to teach you to identify these subtle differences so you can move or coach better.
Forward Shift
The first indication of hip or core dysfunction is a forward shift of the body’s center of mass. This is seen when the bar drifts forward over the toes.
Other indications may be the chest caving down, knees caving in, the butt rising faster than the shoulders, an extreme forward motion of the knees, or the heels rising off the ground. When coaching yourself, you’ll feel more weight on your toes than your heels.
Poor spinal alignment is a major contributor to a forward shift. Lifters are often locked in an overly extended position. This prevents the the body’s weight from shifting backward, and often prevents a lifter from reaching their full range of motion.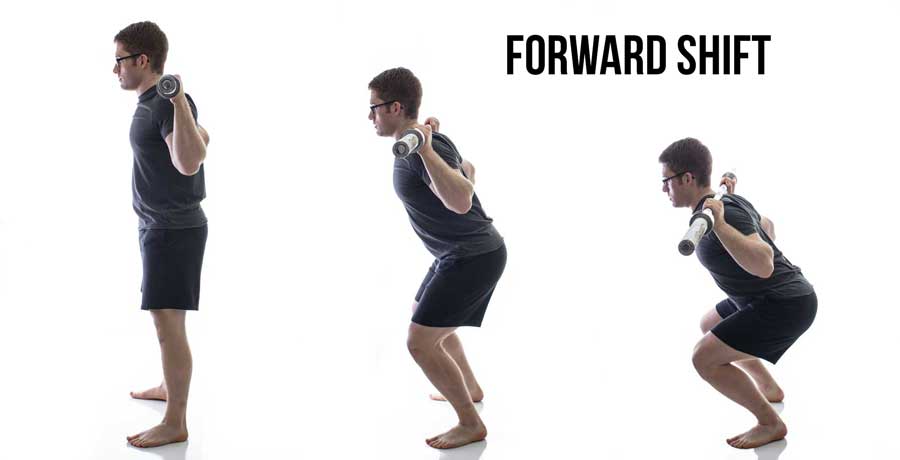
Limited Range of Motion
Forward shift is often accompanied by a limited range of motion. Restoring proper spinal alignment will also usually improve range of motion.
As we extend the spine, this rotates the pelvis forward, using up hip flexion that can’t be used at the bottom of the squat and limiting range of motion. This is why many people have a difficult time reaching adequate depth.
The shape of the actual hip joint may also limit range of motion.
There are also many more in depth reasons that your squat depth could be limited that are beyond the scope of this article. Never force range of motion or into pain.
Fixing Forward Shift and Range of Motion
FOOT POSITION
- Place the feet shoulder-width apart and toes slightly turned outward.
Bracing
- Bracing correctly will restore proper spinal position. When setting up, exhale fully, inhale against abdominal brace, then exhale slightly and hold breath.
Sit Back
- Another fix for a forward shift is to imagine sitting back more throughout the squat, especially at the bottom.
Box Squat
- If this does not work, try a squat to box as mentioned below as a target to sit back to. Lightly tap the box at the bottom of the squat as if there were broken glass on it.
Anterior Load
- If this simple cue does not work, reduce your load of your squat or switch to an anterior-loaded squat variation, such as a plate squat, goblet squat, or front squat.
KNEE VALGUS
- See below for knee valgus corrections.
Elevate Heels
- Elevate the heels using shoes with a heel lift or plates underneath the heels.
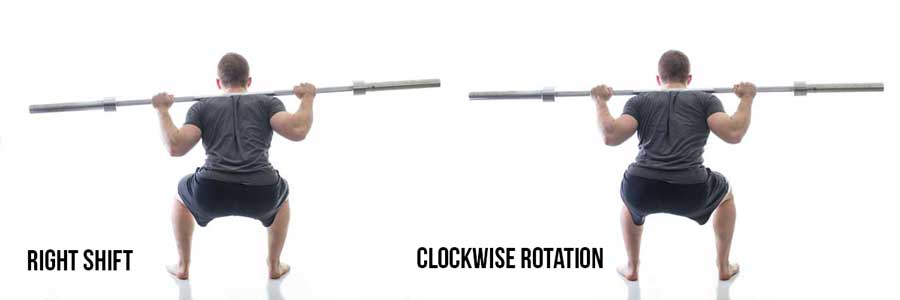
Lateral Shift
The next indication of hip or core dysfunction would be a shift or rotation of the hips, usually at the bottom of the squat.
Most lifters shift their weight to the right leg due to an inherent asymmetry in the body and nervous system. This can be a lateral shift to the right or a clockwise rotation of the pelvis.
The fix for this could be very complex. For many lifters, however, the following cues may correct the problem. These same cues may also fix other problems in the periphery such as the knees or feet.
Spread the floor
- Imagine you’re standing on a towel and you want to spread your feet apart to rip the towel.
Left Heel
- Find and feel your left heel on the ground. Maintain this sensation throughout the motion. By focusing on the left heel, we inhibit the muscles that would otherwise shift us to the right leg.
See also proper bracing and anterior loaded exercises above.
Knee Valgus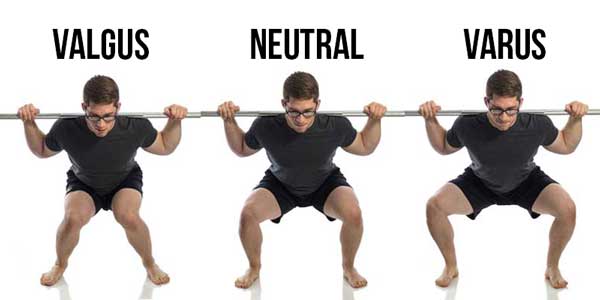
Knee Valgus is the caving inward of one or both knees. Knee valgus is particularly dangerous and is responsible for many knee injuries.
Spread the floor
- See above
Knees Out
- Keeping your feet stationary, turn your knees outward.
Foot Position
- Establish proper foot position. Ensure that the weight is dispersed evenly throughout the foot, not just on the inside.
Band around the knees
- Place a light band around both knees. This forces a lifter to push the knees outward. Perform this for a set, then try a set without the band and attempt to maintain the same position.
Anterior Load
- See exercise progression above for anterior loaded exercises such as the front squat or goblet squat.
Knee Varus
Though it is most common for the knees to cave in during a squat, they can also be pushed too far outward.
Spread the floor
- See above
Foot Position
- Establish proper foot position. Ensure that your weight is dispersed evenly throughout the foot, not just on the outside.
Posterior Weight Shift
Similar to the anterior weight shift, sometimes the weight will shift too far backwards. The bar will be back behind the midfoot and the toes will come up off the ground. There may also be improper spinal alignment.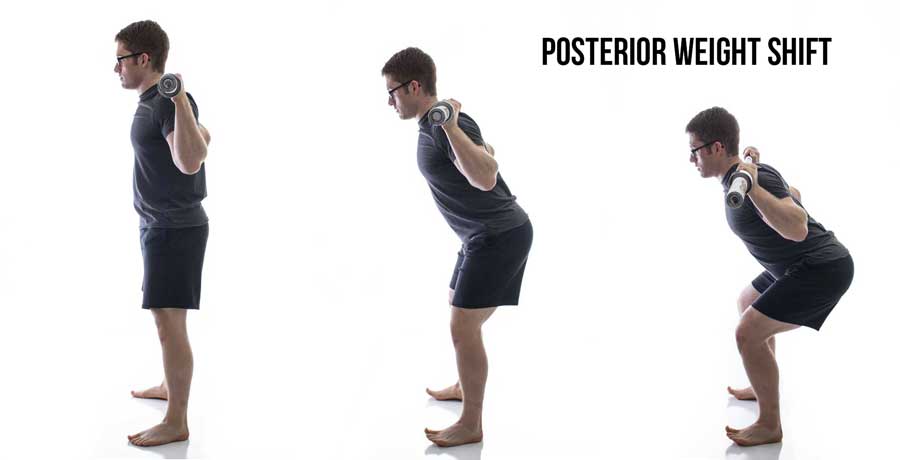
Toes Down
- Don’t allow the toes to leave the ground.
- Similarly, you can imagine your feet as tree roots in the ground.
Sit Down
- Instead of trying to sit back, think about sitting down between the feet.
Bracing
- Bracing correctly will restore proper spinal position. When setting up, exhale fully, inhale against abdominal brace, then exhale slightly and hold breath.
Poor Neck and Head Alignment
The neck and head are an extension of the core. Poor head and neck alignment means poor core alignment. Neck position may inhibit or activate other muscles causing a chain reaction throughout the rest of the body position.
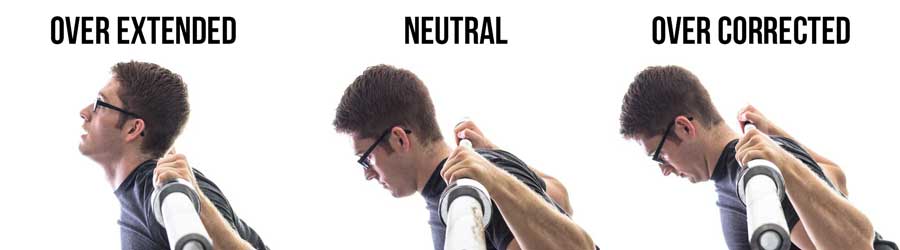
When the head is extended back or the chin is extended forward, the deep abdominals are inhibited increasing back extension resulting in a forward shift or limited range of motion.
Looking down also misaligns the spine pulling the center of gravity forward.
Finally, some lifters over-correct the head position by tucking the chin too far putting tension on the neck.
Head alignment Cues
- Imagine that you’re holding a grapefruit underneath your chin. This tucks the chin but not so much as to put tension on the neck.
- Think about staying “long” from the tail all the way up through the back of the head. This will keep the head inline with the rest of the body.
- Hold a broom handle or pvc pipe against your back as your squat. Maintain 3 points of contact with your head, thoracic spine, and hips all touching the pipe.
Chest Cave
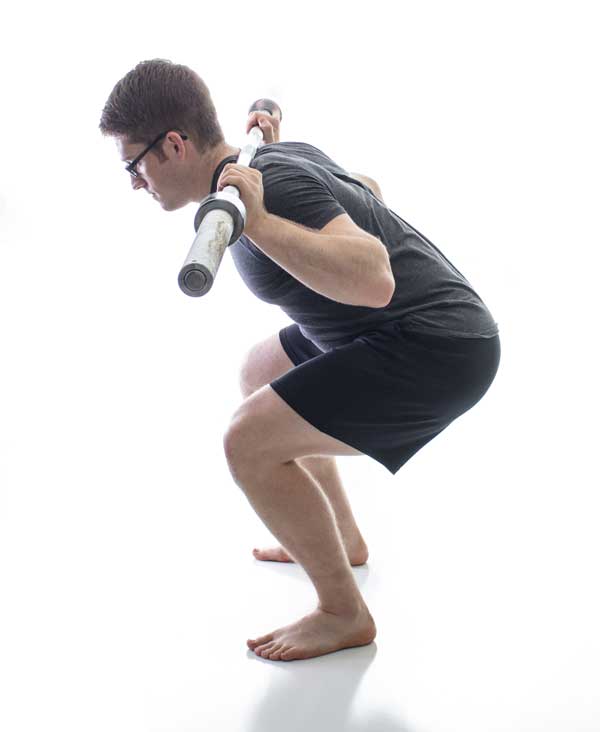 Chest cave often co-occurs with an overly extended spine position as well as an anterior weight shift. When the upper and lower portions of the spine are hyperextended, a hinge forms in the center to compensate.
At the bottom of the squat, the demand increases as the concentric part of the lift begins, so the chest caves in order to bring the hips up.
We can reduce this collapse of the chest by restoring neutral position in the rest of the spine.
Bracing
- Bracing correctly will restore proper spinal position. When setting up, exhale fully, inhale against abdominal brace, then exhale slightly and hold breath.
Reduced load
- The weight may be too heavy to lift with good form. Reduce load to focus on technique.
Chest up
- Focus on keeping the chest high. It’s important to note spinal position, as this cue may drive some lifters into further extension, which should be avoided.
Squatting Too Deep
Egos in the lifting community encourage full range of motion squatting. Full range of motion, however, is person-specific.
Some lifters have greater safe range of motion. These people do well with the Olympic lifts because they can squat very low. They may also find it comfortable to have their feet closer together.
For lifters without this ability, forcing squat depth puts extra stress on the low back. Moving the spine under heavy loads is bad for spinal health. This is why proper bracing is critical. The spine shouldn’t bend or rotate during heavy squatting.
Improve Range of Motion
- Clean up squat motion as above for ways to maximize range of motion.
- Use a taller heel or place a small plate under the heels to increase range of motion. Note that this shouldn’t be used as a crutch and likely hip dysfunction needs to be addressed.
- Check your stance. Extremely wide or narrow stance can eat up hip rotation needed at the bottom.
Limit Depth
- When training for health, there is no need to squat to full depth. Emphasize full safe range of motion. Try squatting to a high box for example.
- A stick squat may be useful for learning where the bottom of the squat should fall. When the back starts to move relative to the stick, stop there. See above.
Reduce Load
- If form degrades purely because of motor control, reducing load and practicing the motion may clean up the bottom of the squat. Some lifters simply have difficulty controlling their position under too much load.
Leading with the Hips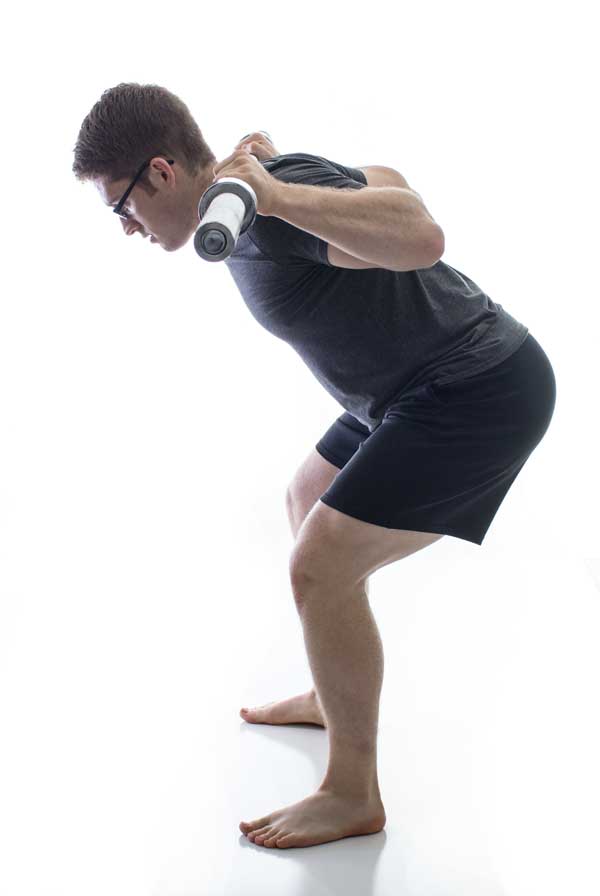
When the glutes and hamstrings are weak, a lifter will rise out of the squat without adequately extending the hips. As the knees extend, the hips rise before the shoulders.
A lifter does this in order to get more passive tension out of the hamstrings, but in the process puts the back in a weaker, more horizontal position.
Reduced Load
- The weight may be too heavy to lift with good form. Reduce load to focus on technique.
Anterior Load
- See exercise progression above for anterior loaded exercises such as the front squat or goblet squat.
Push the Floor Away
- Instead of squatting the bar up, imagine pushing the floor away. This will help extend the hips sooner.
Spread the Floor
- See above
 Leading with the Shoulders
On the way back up, a lifter may extend the spine in order to get stabilization. We see this as the shoulders and upper torso are pushed back. Because the spine is moving while loaded, this puts greater shear stress on the spine.
This often coincides with a posterior weight shift, forward knee motion, neck extension, and weakness in the glutes and hamstrings. If the knees shift forward this also places greater stress on the knee.
Some lifters will lead with the shoulders when cued to keep their “chest up.”
Bracing
- Bracing correctly will restore proper spinal position. When setting up, exhale fully, inhale against abdominal brace, then exhale slightly and hold breath.
Tuck the Chin
- See head and neck alignment above on how to coach the head position.
Anterior Load
- See exercise progression above for anterior loaded exercises such as the front squat or goblet squat.
Shoulder Pain
Shoulder pain can have a large variety of causes which are beyond the scope of this article. However, there are a few options which may help a lifter avoid shoulder pain when squatting.
Fix mechanics
- Work the the cues and exercises above to improve the overall squat motion. Reducing extension may place the shoulders in a more comfortable position.
Experiment with different hand positions
- Different lifters have different shoulder anatomy and varying amounts of shoulder rotation. By placing the hands either closer together or farther apart on the bar, you may find a position that doesn’t cause pain.
Pack the shoulders
- Squeeze the shoulder blades together and pack them down.
Experiment with bar position
- Placing the bar higher on the shoulders may free up space by reducing the amount of external shoulder rotation required.
Knee Pain
Knee pain may also have a large variety of causes which are beyond the scope of this article. However, there are a few options which may help a lifter avoid knee pain when squatting.
Fix mechanics
- Work the the cues and exercises above to improve the overall squat motion.
Reduce range of motion
- Most knee stress occurs at the bottom of the lift. By cutting the range of motion short pain may be avoided. High box squats are a good option.
Hip Pain
Hip pain may also have a large variety of causes which are beyond the scope of this article. However, there are a few options which may help a lifter avoid hip pain when squatting.
It is important to consider that the shape of the hip joint can vary from person to person. Not everyone has the same range of motion.
Fix mechanics
- Work the the cues and exercises above to improve the overall squat motion.
Reduce range of motion
- Most hip pain occurs at the bottom of the lift. By cutting the range of motion short pain may be avoided. High box squats are a good option to limit range.
Anterior Load
- See exercise progression above for anterior loaded exercises such as the front squat or goblet squat. These exercises help to load the hamstrings and glutes which will improve the hip position. The more upright position of the front squat frees up more hip flexion.
Equipment
Rack
The back squat is best executed from a rack because:
- Hooks allow a heavier load than cleaning and jerking.
- Safety pins or rack savers with chains hung from the top make it easier to safely lower the bar if the weight is too heavy. They also catch dropped barbells before the lifter is crushed.
- Safety pins or rack savers allow more squat variations.
| Rack Type | Safety Pins | Overhead Bars |
| Monolift | Some do | Yes |
| Power Rack | Yes – Adjustable | Yes |
| Squat Rack | Yes – Non-Adjustable | – |
| Squat stands w/safety arms | Yes – Adjustable | – |
| Squat stands | – | – |
| Clean and Jerk | – | – |
| Rack Type | Safety Pins | Overhead Bars |
What to look for in a power rack?
- Holes for band pins – These allow you to conveniently connect and then remove bands from the top and bottom of the rack.
- Tightly spaced holes (1″) for hooks or pins at shoulder and bench height.
- If possible, and especially if using bands, racks should be bolted to the ground.
Shoes
What to look for in squat shoes:
- Solid soles – A hard sole provides more feedback or proprioception and makes the body more stable. As an example, a Nike Free would be a poor choice for squatting as the soles are quite soft.
- Strong heel counter – The U-shaped cup around the heel should not easily collapse.
- The right amount of heel lift – More heel lift provides greater mobility increasing squat depth, but it may also encourage back extension and anterior tilt of the hips. Experiment with differing amounts of lift in order to find the best match for your body.
Olympic lifting shoes are a popular choice for squatting. Chuck Taylor’s, with or without the inner soles removed, are popular among power lifters.
Knee Sleeves
Knee sleeves, also known as compression sleeves, keep the knees warm. They are typically made of neoprene which allows flexibility. Some people find that knee sleeves make squatting more comfortable. Rehbands are the most popular brand.
Knee wraps
Although knee wraps keep the knees warm, they also provide a little resistance to knee flexion when wrapped tight. This makes a lifter feel more stable at the bottom and adds a tiny amount of spring to push out of the hole (bottom of the squat).
Compression Shorts
Compression shorts are similar to knee sleeves, but for the hips. They keep the hips warm and comfortable.
Squat Suits and Briefs
Powerlifters use squat suits and briefs (also known as gear) to help provide stability at the bottom of a lift. This also provides support making it easier to lift the weight and rebound out of the bottom. As a powerlifter sits back, the clothing stretches and stores elastic energy, making the weight feel easier.
In general, gear isn’t really necessary unless you’re an elite level powerlifter. Moreover gear encourages you to rely on external stabilization rather than teaching the body to actively stabilize itself. As a result, the form used when lifting in gear will differ from what we recommend here.
FAQ
Who should perform this exercise?
- This exercise is one of the “Big 3” that powerlifters perform in a full meet. If you want to compete in powerlifting, this exercise is a must.
- Athletes can get a lot out of this exercise for it’s strength and size benefits. Any squat pattern, however, will work for most athletes.
Who should not perform this exercise?
- People with knee, hip, or low back problems aggravated by squatting. Limit depth, load, or contraindicate exercise.
- People without spinal and pelvic stability.
- People with femoroacetabular impingement may have trouble squatting, especially to low depths. Range of motion should be limited for these people.
Related tests which would suggest using this exercises
- Other squatting has proven to be effective, and it’s time for more variation in your training.
- Lots of hip mobility (LINK here’s how you check hip mobility).
- Effective stabilization in half kneeling position.
Stabilization
- This exercise is mostly done in the sagittal plane.
- The frontal and transverse planes are also used, but their emphasis is shifted towards that of stabilization.
Primary muscles worked
- Quadriceps
- Hamstrings
- Adductor magnus
- Glutes
Secondary muscles worked
- Erector spinae
- Abdominals
- Latissimus dorsi
- Trapezius
- Rhomboids